Using the Popup Toolkit
This guide explains how to create popups that can be used to add functionality to widgets or create standalone launchers.
What’s in the toolkit?
The Toolkit has two types of object, a layout and a control. The layout is the container that helps organise the presentation of the popup. The controls are the objects that display the content.
A simple comparison would be to think of the Bar as the layout and widgets as the
controls. However, a key difference of this toolkit is that the controls can be placed
anywhere in a 2D space whereas widgets can only be ordered in one dimension.
Layouts
The toolkit provides three layouts: PopupGridLayout, PopupRelativeLayout and
PopupAbsoluteLayout.
Descriptions and configuration options of these layouts can be found on the reference page.
Controls
Currently, the following controls are provided:
PopupText: a simple text display objectPopupImage: a control to display an imagePopupSlider: a control to draw a line which marks a particular value (e.g. volume level)PopupCircularProgress: a control to draw a curved line showing progress etc.PopupWidget: a control to display a Qtile widget in the popup
Configuration options for these controls can be found on the reference page.
Callbacks
To add functionality to your popup, you need to bind callbacks to the individual controls.
This is achieved in the same way as widgets i.e. a dictionary of mouse_callbacks is passed
as a configuration option for the control. The control accepts any callable function but also
accepts lazy objects like those used for key bindings.
Building a popup menu
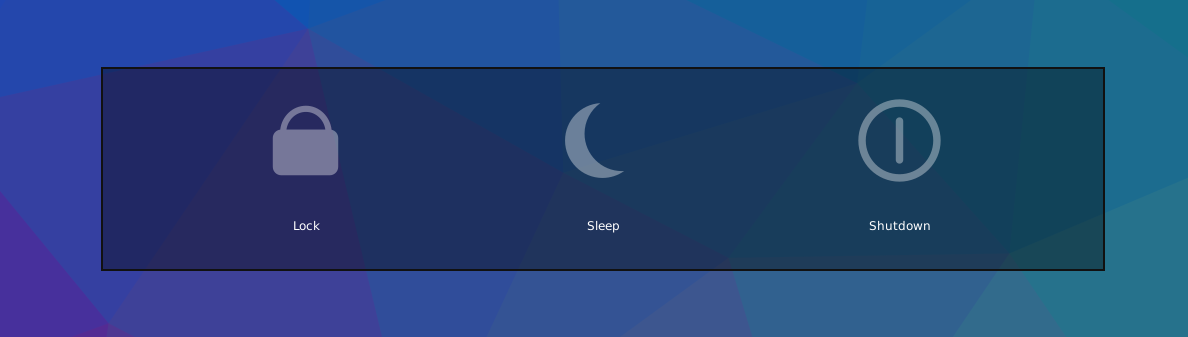
Below is an example of creating a power menu in your config.py.
from qtile_extras.popup import (
    PopupRelativeLayout,
    PopupImage,
    PopupText
)

def show_power_menu(qtile):

    controls = [
        PopupImage(
            filename="~/Pictures/icons/lock.svg",
            pos_x=0.15,
            pos_y=0.1,
            width=0.1,
            height=0.5,
            mouse_callbacks={
                "Button1": lazy.spawn("/path/to/lock_cmd")
            }
        ),
        PopupImage(
            filename="~/Pictures/icons/sleep.svg",
            pos_x=0.45,
            pos_y=0.1,
            width=0.1,
            height=0.5,
            mouse_callbacks={
                "Button1": lazy.spawn("/path/to/sleep_cmd")
            }
        ),
        PopupImage(
            filename="~/Pictures/icons/shutdown.svg",
            pos_x=0.75,
            pos_y=0.1,
            width=0.1,
            height=0.5,
            highlight="A00000",
            mouse_callbacks={
                "Button1": lazy.shutdown()
            }
        ),
        PopupText(
            text="Lock",
            pos_x=0.1,
            pos_y=0.7,
            width=0.2,
            height=0.2,
            h_align="center"
        ),
        PopupText(
            text="Sleep",
            pos_x=0.4,
            pos_y=0.7,
            width=0.2,
            height=0.2,
            h_align="center"
        ),
        PopupText(
            text="Shutdown",
            pos_x=0.7,
            pos_y=0.7,
            width=0.2,
            height=0.2,
            h_align="center"
        ),
    ]

    layout = PopupRelativeLayout(
        qtile,
        width=1000,
        height=200,
        controls=controls,
        background="00000060",
        initial_focus=None,
    )

    layout.show(centered=True)

keys = [
    ...
    Key([mod, "shift"], "q", lazy.function(show_power_menu))
    ...
]
Now, when you press Mod+shift+q you should see a menu looking like this:
Using widgets in a popup
It is possible to display widgets in a popup window and not just in the bar. This is possible by using
the PopupWidget control.
Below is a quick example for displaying a number of graph widgets in a popup:
from libqtile import widget
from qtile_extras.popup import (
    PopupRelativeLayout,
    PopupWidget
)

def show_graphs(qtile)
    controls = [
        PopupWidget(
            widget=widget.CPUGraph(),
            width=0.45,
            height=0.45,
            pos_x=0.05,
            pos_y=0.05
        ),
        PopupWidget(
            widget=widget.NetGraph(),
            width=0.45,
            height=0.45,
            pos_x=0.5,
            pos_y=0.05
        ),
        PopupWidget(
            widget=widget.MemoryGraph(),
            width=0.9,
            height=0.45,
            pos_x=0.05,
            pos_y=0.5
        )
    ]

    layout = PopupRelativeLayout(
        qtile,
        width=1000,
        height=200,
        controls=controls,
        background="00000060",
        initial_focus=None,
        close_on_click=False
    )
    layout.show(centered=True)

keys = [
    ...
    Key([mod, "shift"], "g", lazy.function(show_graphs))
    ...
]
Pressing Mod+shift+g will present a popup window looking like this:

Updating controls
There may be times when you wish to update the contents of the popup without
having to rebuild the whole popup. This is possible by using the
popup.update_controls method. The method works by taking the name of the
control (as set by the name parameter) as a keyword. Multiple controls can
be updated in the same call.
from qtile_extras.popup import (
    PopupRelativeLayout,
    PopupText
)

text_popup = None

def create_text_popup(qtile):
    global text_popup
    text_popup = PopupRelativeLayout(
        qtile,
        width=400,
        height=200,
        controls=[
            PopupText(
                text="Original Text",
                width=0.9,
                height=0.9,
                pos_x=0.05,
                pos_y=0.05,
                v_align="middle",
                h_align="center",
                fontsize=20,
                name="textbox1"
            ),
        ],
        inital_focus=None,
        close_on_click=False,
    )

    text_popup.show(centered=True)

def update_text_popup(qtile):
    text_popup.update_controls(textbox1="Updated Text")
Extending widgets
To simplify the process of adding popup support to widgets, users are
advised to use the qtile_extras.widget.mixins.ExtendedPopupMixin class
as this will create a number of attributes and methods to help display popups.
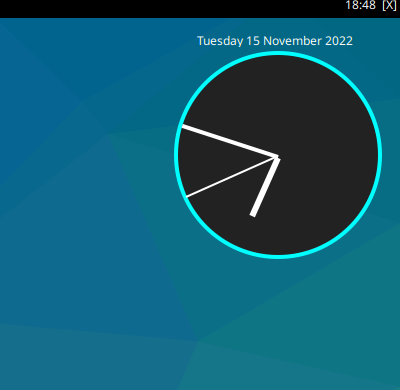
For example, to make the Clock widget show the long date when clicked:
from datetime import datetime

from libqtile import widget

from qtile_extras import widget as extrawidgets
from qtile_extras.popup import PopupRelativeLayout, PopupText, PopupWidget
from qtile_extras.widget.mixins import ExtendedPopupMixin


class ExtendedClock(widget.Clock, ExtendedPopupMixin):
    def __init__(self, **config):
        widget.Clock.__init__(self, **config)
        ExtendedPopupMixin.__init__(self, **config)
        self.add_defaults(ExtendedPopupMixin.defaults)
        self.add_callbacks({"Button1": self.show_popup})

    def _update_popup(self):
        longdate = datetime.now().strftime("%A %d %B %Y")
        self.extended_popup.update_controls(longdate=longdate)


clock_layout = PopupRelativeLayout(
    width=250,
    height=250,
    controls=[
        PopupText(
            name="longdate",
            pos_x=0.1,
            pos_y=0.05,
            width=0.8,
            height=0.05,
            h_align="center",
        ),
        PopupWidget(
            widget=extrawidgets.AnalogueClock(
                second_size=2,
                minute_size=4,
                hour_size=6,
                face_shape="circle",
                face_background="222222",
                face_border_width=4,
            ),
            pos_x=0.05,
            pos_y=0.1,
            width=0.9,
            height=0.9,
        ),
    ],
    background="00000000",
)

extended_clock = ExtendedClock(
    popup_layout=clock_layout,
    popup_hide_timeout=0,
    popup_show_args={"relative_to": 3, "relative_to_bar": True},
)
Putting extended_clock in your bar and clicking on the clock will give you this:
Building simple text menus
The toolkit also contains some basic classes to simplify the creation of text based menus.
The primary use of these classes is to provide context menus for widgets (e.g. StatusNotifier)
but they can also be easily incorporated directly in config files.
For example, to recreate the power menu above using text, you could define the following:
from libqtile.lazy import lazy

from qtile_extras.popup import PopupMenu, PopupMenuItem, PopupMenuSeparator


@lazy.function
def show_text_power_menu(qtile):
    items = [
        PopupMenuItem(text="Power Menu", enabled=False),
        PopupMenuSeparator(),
        PopupMenuItem(
            text="Lock",
            mouse_callbacks={
                "Button1": lazy.spawn("/path/to/lock_cmd")
            }
        ),
        PopupMenuItem(
            text="Sleep",
            mouse_callbacks={
                "Button1": lazy.spawn("/path/to/lock_cmd")
            }
        ),
        PopupMenuItem(
            text="Shutdown",
            highlight="900",
            mouse_callbacks={
                "Button1": lazy.shutdown()
            }
        ),
    ]
    menu = PopupMenu.generate(qtile, menuitems=items, border_width=2)
    menu.show(centered=True)

keys = [
    ...
    Key([mod, "shift"], "q", show_text_power_menu)
    ...
]
Pressing Mod + shift + B will display the following:
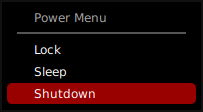
Menu items have a default blue/green highlight but this was overriden to show red for the shutdown command.
Note that the menu items can be configured individually. Configuration options for the layout
(border etc.) are passed to the generate method.
Alternatively, the PopupMenu.make_generators method can be used to apply a config to menu items
and the layout. It returns three functions which are used to create menu items, separators and the layout.
For example, to recreate the text menu above with a custom theme, you could do the following:
from libqtile.lazy import lazy

from qtile_extras.popup import PopupMenu


# Define config for menu and create functions to generate menu
menu_config = {
    "foreground": "0ff",
    "foreground_disabled": "666",
    "foreground_highlighted": "fff",
    "highlight": "900",
    "border_width": 2
}

item, separator, generate = PopupMenu.make_generators(**menu_config)


@lazy.function
def show_text_power_menu(qtile):
    items = [
        item(text="Power Menu", enabled=False),
        separator(),
        item(
            text="Lock",
            mouse_callbacks={
                "Button1": lazy.spawn("/path/to/lock_cmd")
            }
        ),
        item(
            text="Sleep",
            mouse_callbacks={
                "Button1": lazy.spawn("/path/to/lock_cmd")
            }
        ),
        item(
            text="Shutdown",
            mouse_callbacks={
                "Button1": lazy.shutdown()
            }
        ),
    ]
    menu = generate(qtile, menuitems=items)
    menu.show(centered=True)

keys = [
    ...
    Key([mod, "shift"], "q", show_text_power_menu)
    ...
]
Configuration options for the menu objects can be found on the reference page.